
Whether migrating a site from another host, restoring a database snapshot, or executing staging environment synchronization, importing a database is a core task for webmasters. While modern control panels automate many site creation workflows, direct database management via phpMyAdmin gives you complete visual control over your MySQL schemas, tables, and raw SQL execution.
In this guide, we’ll walk through how to access phpMyAdmin directly from OneStopWP and import a database dump file securely.
Prerequisites
Before starting, ensure you have:
- Access to your OneStopWP account: Credentials to log into your user portal.
- Database Backup File: A valid
.sql,.sql.zip, or.sql.gzexport file from your source database. - Database File Size Check: If your backup file is larger than the default phpMyAdmin upload limit, ensure it is compressed as a
.zipor.gzarchive before uploading.
Step 1: Access phpMyAdmin in OneStopWP
OneStopWP provides single-click authentication into phpMyAdmin, so you don't need to manually hunt for database host IPs or type in complex MySQL password strings.
- Log in to your OneStopWP dashboard.
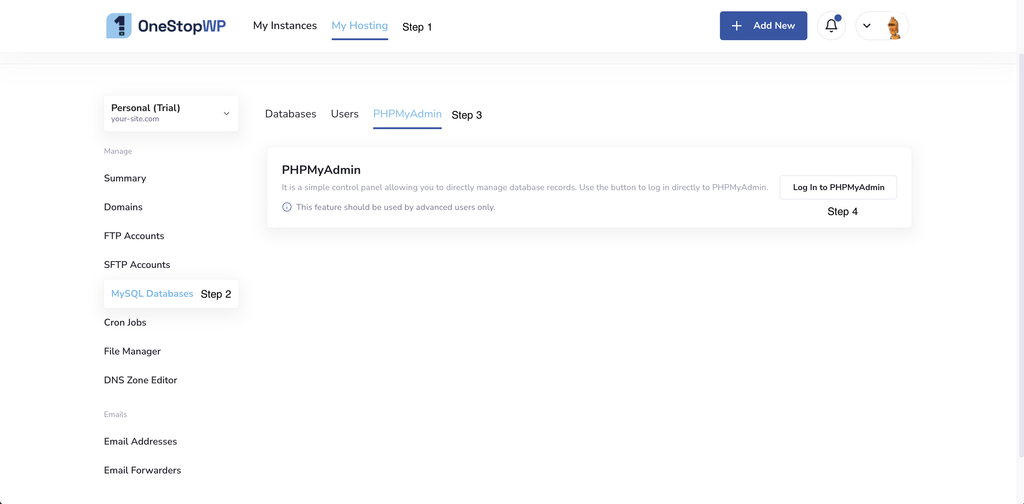
- Navigate to My Hosting -> MySQL Databases -> PHPMyAdmin tab.
- Click the Log In to PHPMyAdmin button.
- OneStopWP will open phpMyAdmin in a new browser tab with your session automatically authenticated.
Step 2: Prepare the Target Database (Optional Pruning)
If you are importing a full database replacement (e.g., migrating an entire WordPress site over an existing installation), importing on top of existing tables can cause conflicts or duplicated prefixes.
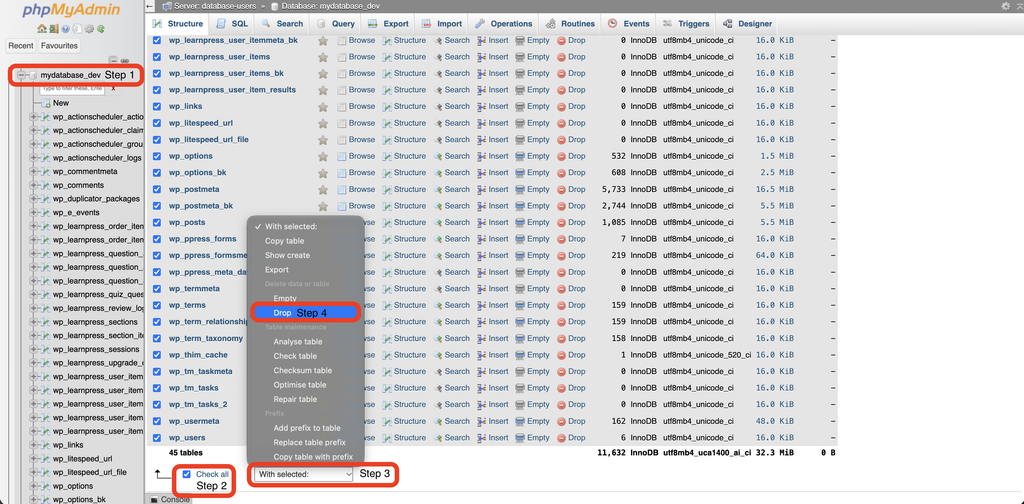
- In the left-hand sidebar of phpMyAdmin, click on your target database name.
- Scroll to the bottom of the table list and click Check all.
- From the "With selected:" drop-down menu, choose Drop.
- Confirm the prompt when asked if you wish to drop all tables.
⚠️ Warning: Dropping tables permanently deletes all current content, users, and options in that database. Ensure you have a fresh backup before running a drop statement!
Step 3: Import Your .sql or Compressed Archive
Once your database is ready, you can perform the import:
- Click on your target database name in the left menu so you are in the database context.
- Click the Import tab on the top menu bar.
- In the File to Import section, click Choose File (or Browse) and select your
.sql,.sql.zip, or.sql.gzdump file. - Leave Format set to SQL.
- Leave character set configuration as default (
utf8mb4/utf8). - Scroll down and click Go.
Depending on file size and table structure, execution usually completes within a few seconds. Once completed, phpMyAdmin will show a green banner stating: "Import has been successfully finished."
If you met any issues in your import process, you can always contact our Technical Support Team.
Common Post-Import Step: Updating Site URLs
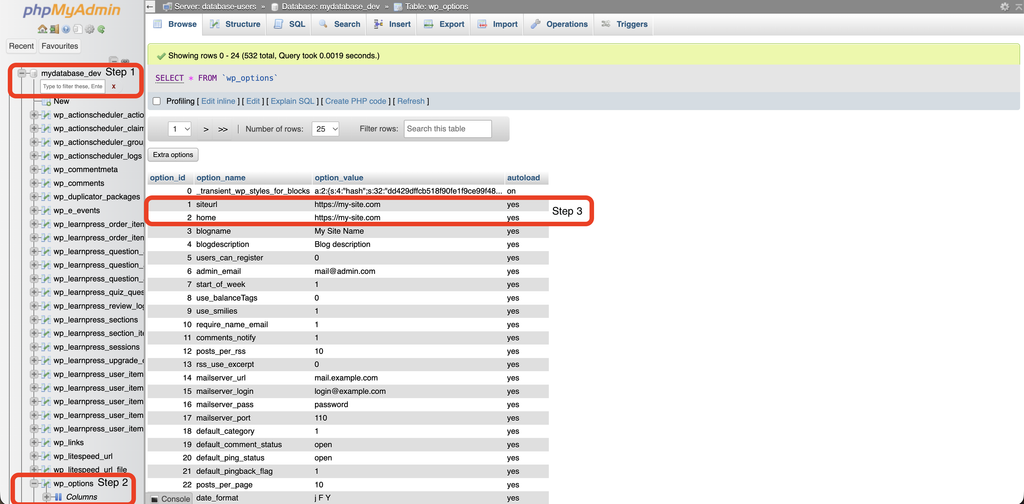
If you imported a database from a staging or local environment, remember to update the site home URL in the wp_options table:
- Click the
wp_optionstable (or your custom prefix equivalent, e.g.,wp_5x_options) in the left menu. - Find the rows where
option_nameequalssiteurlandhome. - Double-click the
option_valuecell for each and enter your active site URL (e.g.,https://my-site.com).
High-Performance Database Infrastructure with OneStopWP
At OneStopWP, database operations are seamless. Our managed hosting provides instant phpMyAdmin access, automated snapshot backups, and custom caching via our WPCacheOn plugin to keep your database fast and reliable at scale.
👉 Looking for reliable, developer-friendly managed hosting? Explore OneStopWP plans today.